Resonance Assignment/Abacus/Spin systems identification: Difference between revisions
Jump to navigation
Jump to search
15N_HSQC
No edit summary |
No edit summary |
||
| Line 4: | Line 4: | ||
=== <span>Figure 4.1A</span> === | === <span>Figure 4.1A</span> === | ||
<div><span> [[Image:Fmcgui Fig4.1a.jpg|thumb|center|600px]] </span></div><div><span> | <div><span> [[Image:Fmcgui Fig4.1a.jpg|thumb|center|600px]] </span></div><div><span> | ||
| Line 29: | Line 45: | ||
*<span><span> </span></span>load referenced 15N_HSQC peak list { [[FMCGUI commands#Data.3EN15_HSQC.3E|DATA>N15 HSQC>load]] }<br> | *<span><span> </span></span>load referenced 15N_HSQC peak list { [[FMCGUI commands#Data.3EN15_HSQC.3E|DATA>N15 HSQC>load]] }<br> | ||
*<span><span> </span></span>set tolerances for matching of resonances in different spectral dimensions { [[FMCGUI commands#Data.3ETolerances|Data>Tolerances]] }<br> | *<span><span> </span></span>set tolerances for matching of resonances in different spectral dimensions { [[FMCGUI commands#Data.3ETolerances|Data>Tolerances]] }<br> | ||
*<span><span> </span></span>create bPB-fragments { | *<span><span> </span></span>create bPB-fragments { [[FMCGUI_commands#Fragment.3ECreat.3Efawn|Fragment>create>fawn]] }<br> | ||
<div>First, a referenced C13_hsqc peak list is created and shown in new window ‘fake C13 HSQC’. Warning messages are shown in the project main window. You have to check the list and modify it if needed. Then, press ‘OK’ button in the ‘‘fake C13 HSQC’ window. In the result, new window ‘Create Fragment’ pops up. The window consists of three sections. The left sections contains suggested ''b''PB-fragments, while the other sections contains two reports of fragments scoring with both C and H resonances and with only C resonances, respectively. Consider warning messages shown in the project main window and check/modify generated ''b''PB-fragments in the left section of “Create Fragment” window. When satisfied, the ''b''PB-fragments will be loaded in the memory by clicking on “OK” button.</div> | <div>First, a referenced C13_hsqc peak list is created and shown in new window ‘fake C13 HSQC’. Warning messages are shown in the project main window. You have to check the list and modify it if needed. Then, press ‘OK’ button in the ‘‘fake C13 HSQC’ window. In the result, new window ‘Create Fragment’ pops up. The window consists of three sections. The left sections contains suggested ''b''PB-fragments, while the other sections contains two reports of fragments scoring with both C and H resonances and with only C resonances, respectively. Consider warning messages shown in the project main window and check/modify generated ''b''PB-fragments in the left section of “Create Fragment” window. When satisfied, the ''b''PB-fragments will be loaded in the memory by clicking on “OK” button.</div> | ||
*<span> save project PRJ_1. { [[FMCGUI commands#Project.3ESave|Project>Save]] } or { [[FMCGUI commands#Project.3EQuit|Project>Quit]] } | *<span> save project PRJ_1. { [[FMCGUI commands#Project.3ESave|Project>Save]] } or { [[FMCGUI commands#Project.3EQuit|Project>Quit]] } | ||
| Line 35: | Line 51: | ||
<br> | |||
<br> | <br> | ||
Revision as of 19:52, 2 December 2009
Normally, the NMR spectra shown in Table 1 are collected for ABCUS. Spectra should ideally be collected from the same protein preparation and under the same conditions to make sure peaks are within tolerance between spectra. All spectra need to be appropriately synchronized and calibrated against reference spectra of your choice. It is a good idea to use as a reference for spectra calibration the 2D HN-projection of 15N-NOESY and the 2D CH-projection of the 13C-NOESY.
Step 1. Generate HN-rooted spin-systems (bPB-fragments)
15N_HSQC
HNCO
CBCA(CO)NH
HBHAC (CO)NH
HNCA
15N_NOESY
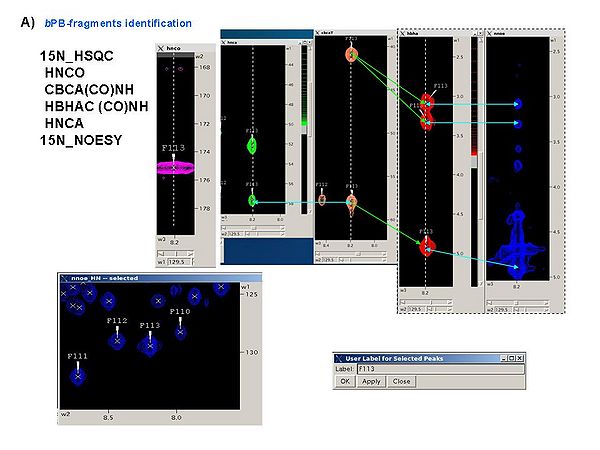
It is a good idea to analyze all these spectra simultaneously, for example, using SPARKY, in order to obtain peak lists of 15N_HSQC, HNCA, CBCA(CO)NH, and HBHA(CO)NH spectra (see Figure 4.1A). The first two spectra should be referenced.
Figure 4.1A
- start new project PRJ_1 { Poject>new }
- load protein sequence { DATA>Protein Sequence>load }
- load referenced HNCA peak list { DATA>HNCA>load }
- load referenced CBCA(CO)NH peak list { DATA>CBCACONH>load }
- load referenced HBHA(CO)NH peak list { DATA>HBHACONH>load }
- load referenced 15N_HSQC peak list { DATA>N15 HSQC>load }
- set tolerances for matching of resonances in different spectral dimensions { Data>Tolerances }
- create bPB-fragments { Fragment>create>fawn }
First, a referenced C13_hsqc peak list is created and shown in new window ‘fake C13 HSQC’. Warning messages are shown in the project main window. You have to check the list and modify it if needed. Then, press ‘OK’ button in the ‘‘fake C13 HSQC’ window. In the result, new window ‘Create Fragment’ pops up. The window consists of three sections. The left sections contains suggested bPB-fragments, while the other sections contains two reports of fragments scoring with both C and H resonances and with only C resonances, respectively. Consider warning messages shown in the project main window and check/modify generated bPB-fragments in the left section of “Create Fragment” window. When satisfied, the bPB-fragments will be loaded in the memory by clicking on “OK” button.
- save project PRJ_1. { Project>Save } or { Project>Quit }
Step 2. Complete PB-fragments
At this step bPB-fragments are completed with aliphatic side-chain resonances and additional spin-systems (without HN) are identified using the following spectra.
13C-HSQC
(H)CCH-TOCSY
H(C)CH-TOCSY
13C-NOESY
2.1. Generate expected peak lists for C13HSQC, (H)CCH-TOCSY, and H(C)CH-TOCSY spectra using created bPB fragments:
- open project PRJ1 { Project>load }
- generate expected C13hsqc_exp.list that consists of Ca-Ha and Cb-Hb moieties { Fragment>Expected Peaks>C13HSQC }
- generate expected CCH-Tocsy.list { Fragment>Expected Peaks>(H)CCH }
- generate expected HCH-Tocsy.list { Fragment>Expected Peaks>H(C)CH }
2.2 Read the generated peaks into SPARKY.
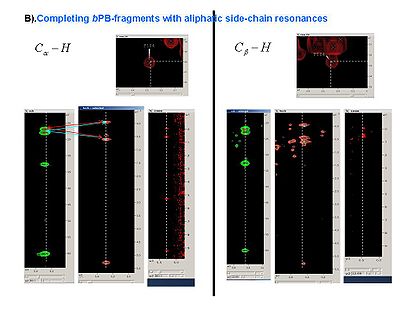
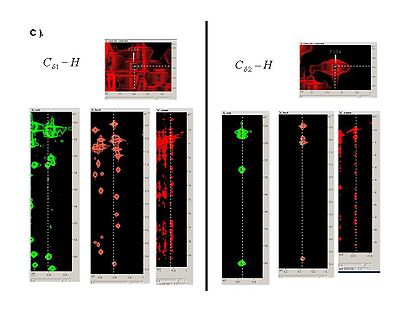
2.3 Using SPARKY, complete bPB fragments with aliphatic side-chain resonances by analyzing Ca-Ha and Cb-Hb strips in all CH_rooted spectra (see Figure 4.1B,C). New resonances should be peaked and referenced only in 13C_HSQC spectrum.
Figure 4.1B,C
2.4 When all peaks corresponding to HN-rooted spin-systems are peaked in 13C_HSQC spectrum, the unpicked peaks are used as a starting point for identification of spin-systems without backbone HN resonances (PB fragments corresponding to residues before prolines in the protein sequence, last residue and residues missing in HN-rooted spectra).
Step 3. Spin-systems validation and correction
Validate PB-fragments using FMCGUI:
- start a new project PRJ2 [Project>new]
- load protein sequence [DATA>Protein Sequence>load]
- load referenced 15N_HSQC peak list [DATA>N15 HSQC>load]
- load referenced 13C_HSQC peak list [DATA>C13 HSQC>load]
- load referenced HNCA peak list [DATA>HNCA>load]
- load CBCA(CO)HN peak list [DATA>CBCACOHN>load]
- load HNCO peak list [DATA>HNCO>load]
- set tolerances for matching of resonances in different spectral dimensions [DATA>Tolerances]
- create and validate PB fragments [Fragment>create>abacus]
This command starts script ‘sps_create’. In the result, a new window ‘Create Fragment’ pops up. The warning messages of the ‘sps_create’ script are shown in the main window and indicate spin-system that have low score (see Figure 1.2), namely, spin=systems with Smax < 10-4. Following the warnings check and modify, if necessary, generated PB-fragments in the left section of “Create Fragment’ window (see [[Introduction_to_ABACUS#Figure_1.2|Figure 2.5). Alternatively, go back to spectra, fix peak lists accordingly, and repeat the fragment generation/validation again.
When satisfied, the PB-fragments will be saved (file ‘sps_pb.dat’ into directory PRJ2/sps) and loaded in the memory by pressing OK button in “Create Fragment” window.
- save project PRJ2 [Project>Save] or [Project>Quit]


